

Page Properties
The Page proprties is a dialogue box with which you can change the way page is set out, the example on the right shows the page setup dialogue box relating to the margins (those bits of space down the right and left-hand sides of your page). These work in the following way:
 |
Ppage setup dialogue box
relating to the margins |
 |
Page setup dialogue box relating to
Paper Size |
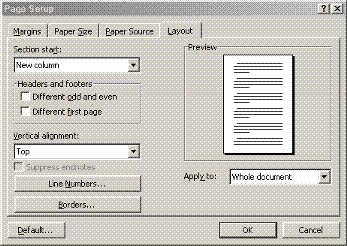 |
Page setup box relating
to the layout |
Top - Clicking on the small black downward pointing arrow on this box will make the top space of the page smaller so your text will be nearer the top of the page and clicking on the small black upward pointing arrow will make the space at the top of the page larger so your document space will be smaller.
Bottom - This works in the same way as the top box but affects the bottom space of your page.
Left - Clicking on the small black arrow pointing downwards on this box will reduce the space (left margin) on the left-hand side of the page and clicking on the small black arrow will increase the space on the left-hand side fo the page (increase the left margin).
Right - This wil do as the left does but will apply the settings to the right-hand side of the page or right margin.
Gutter - This is what the Word help has to say about a gutter: In a document with two-sided pages, the term gutter refers to a margin setting that adds extra space to the side or top margin of a document you plan to bind. A gutter margin ensures that text isn't obscured by the binding. As with the other options, clicking on the small downward pointing arrow decreases the space the gutter takes up and clicking on the small black upward pointing arrow will increase the space the gutter takes up. (actually I haven't needed to use the gutter)
The Paper Size tab
These settings alter the size and orientaion of the page. The paper size box produces a drop down list of different sizes of paper that your page can be, for example you wish to have your page A5 size, (half of the default A4 size), you would select this from the drop down list of paper sizes.
Clicking on the small black down and upward pointing arrows on the Width and Height boxes will make your document change size to match, any changes to the size of your document will be reflected in the document with the lines on it in the preview section
You can also make the paper portrait as it is when you start Word or make it landscape, (turn it on it it's side)
Paper Source relates to the printer, you tell Word to look in the printer tray for the paper to print on.
The Layout tab - This relates to the layout of the page, the Section start is asking you where you to start, for example on a new page, on an odd page, on an even page, etc.
Headers and Footers - Headers and footers are small parts of the top and bottom of the documents (a bit like top and bottom margins) which can contain things like page numbers, logo's, annotations, etc.
Vertical alignment - this allows you to vertically align things on the page, for example at the top of the page, in the middle of the page or at the bottom of the page.
Now, I know it doesn't appear obvious but the pictures in the examples on the right use vertical alignment. They are in a table (an invisible container or visible if the border is set to a value greater than zero). By default, it places the picture in the middle of the cell in the table, (this particular table runs all the way down the right-hand side of the page From underneath the first paragraph with a column of one and 8 rows. So each row would be a separate cell (or little square space on the page).
OK, if the position of the picture is in the middle of one of these little square spaces, it would be no good if what I was typing about it was so far down the page it didn't make sense because you couldn't see what I was referring to, so I have to stretch the little space (cell) down the page until the bottom line of it is level with approximately the middle of the text that discusses it and place the picture with a vertical alignment at the bottom of the cell, and write the heading underneath it in a small wide space (cell).
You can see where the text at the bottom of the page wraps round the invisible table. See the tutorial on Tables for how tables work
![]()