

The Insert Menu
 |
The Insert menu |
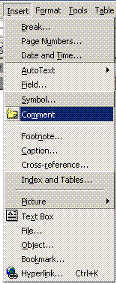
Although Microsoft Word creates another page when you type past the last character space there are times when you need to create your own new page. You could repeatedly press the return / enter key and create a series of blank lines till you are on the next page or you could just insert a page break and that would do the job, you may wish to insert a picure, either a photo you have taken or a piece of clipart, it is all done through the Insert menu. An example of the Insert menu is hsown on the right.
We'll go through the main items in the insert menu.
| Page Breaks | Page numbers | Insert the Date |
| Insert a file from disk | Inserting clipart | Wordart |
| Hyperlinks | Symbol |
1. Place the cursor (also the insertion point) where you wish the page break to go
2. Click on the Insert menu button
3. Click on the Page Break option
If you placed the cursor below the very last line of your document then you see a blank page beneath the original one, if you inserted the page break within the text of the document then any text to the right of and below the cursor will be placed on a new page.
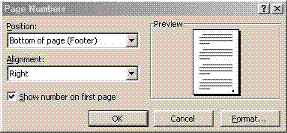 |
Insert Page Numbers dialogue box |
1. Click on the Insert menu button
2. You will see the dialogue box shown onthe right, make whatever settings you wish
3. Click on the OK button
The various pages in your document should now be numbered in the way you specified
 |
Insert Date dialogue box |
1. Place the cursor where you would like to insert the date
2. Click on teh Insert menu button and the dialogue box shown right will appear
3. Select the date format you wish to use
4. Click on the OK button at the bottom of the dialogue box.
The date will now be placed where you wished in the format that you selected
Inserting pictures and fancy text can spice up your document especially if you are doing an advert or a leaflet, word can do this but I must inject a word of advice here, sometimes your picture will jump about on the page and no matter how much you try you won't be able to put it exactly where you want it but the facility is there and therefore included here.
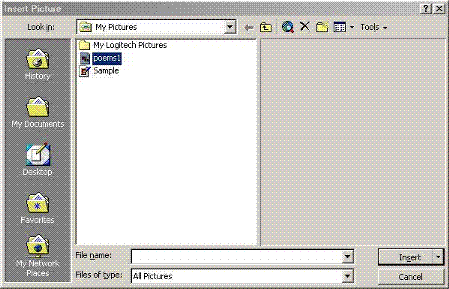 |
The Insert Picture from
file dialogue box |
1. Place the cursor (the I bar ) where you wish to insert the picture
2. click on the Insert menu button
3. let the mouse pointer rest briefly on the Picture option and from the resulting menu click on the From File option and a standard windows file navigation box shown will be diaplayed
4. Navigate to the picture (file) you wish to insert and click on it to select it
5. Click on the Inseret button down in the bottom right-hand cornerof the dialogue box
The picture you chose will now be placed where you had the cursor. You can centre it or move it to the right of the page and back to the left of the page using the left align, Centre and Right Align buttons
Clipart is different from files you save to disk but behave in the same way and are inserted in a similar way. Clipart are small colourful pictures that are much smaller in size. To insert clipart do the following:
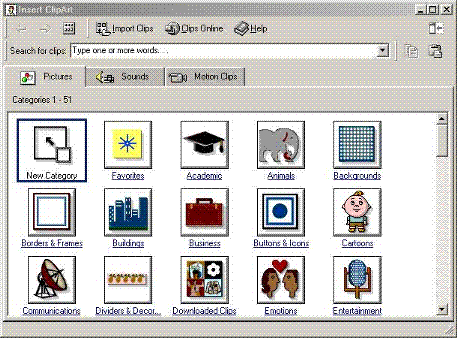 |
1. Place the cursor where you wish to insert the item of clipart
2. Click on the Insert menu button
3. Let the cursor rest briefly on the Picture option and from the resulting menu select Clipart and the dialogue box on the right should be displayed.
there are two ways to find your clipart:
3a. Click on a category and scroll through all the clipart in itor3b. Type a word related to the item of clipart you wish to insert into the Search for clips text box and all clipart relating to that word will be displayed in a scrollable window.
4. Whichever it's done, click on the item of clipart and a little list will appear next to your cursor, click on the top option and the item of clipart will be inserted into the document at the position you indicated with the cursor.
NOTE:- After you have inserted the clipart, the clipart library dialogue box shown above will remain on the screen, you need to click on the x in the top right-hand corner to close it and see your document again.
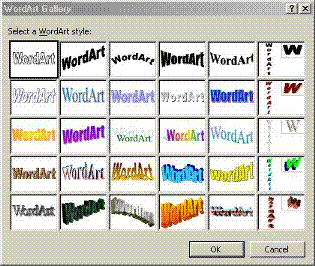 |
Wordart library dialogue box |
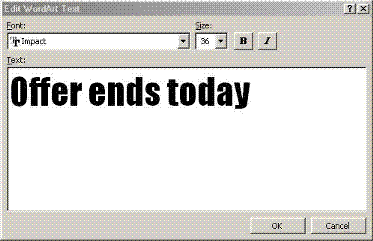 |
Insert wordart text dialogue
box |
Wordart is a way of putting colourful and fancy text for titles and such like into your document and is done as follows:
1. Place your cursor at a plce in your document where you wish to place the item of Wordart
2. Click on the Insert menu button
3. Let the mouse pointer rest briefly on the picture option and from the resulting menu select Wordart and you will see the wordart library shown opposite
4. Click on the shape you wish to use to select it
5. Click on the OK button and you be presented with a box into which you type the text you wish to see in the pattern you selected as shown on the right. I've typed in Offer end today as prelude to designing an advert, you will see Your text here displayed
6. clikc on the ok button and the text will be placed into your document at the place you indicated with the text cursor. An example of my would be advert is shown below
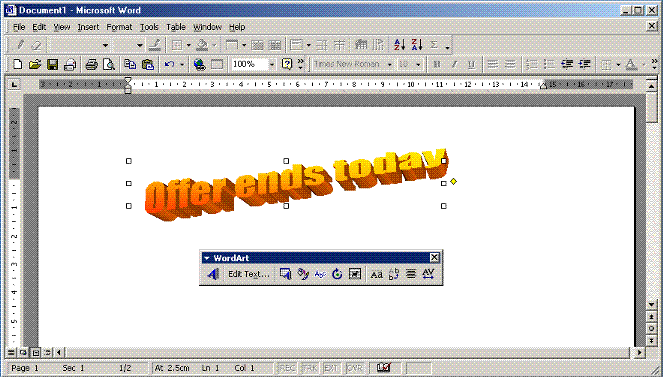 |
Example of wordart inserted into a
document |
The item of wordart is inserted into the document along with sizing handles (those 6 little squares around it) and a menu through which you can tweak and customise the wordart to an extent, letting your cursor rest briefly on each button in the toolbar will tell what each button does in a tool tip.
The sizing handles are ther eto change the size of your wordart, place the mouse pointer on one of the small squares and it will turn int a double headed arrowhead, the arrows tell you which way you can resize the wordart, for example, if you place the mouse pointer on the bottom middle sqaure (sizing handle) you will see the mouse pointer change to a double headed arrow pointing up and down, you can only move that sizing handle up and down and make it smaller or longer.
To Highlight (select) text, do the following:
1. Place the mouse pointer (which will look like a blinking I bar) just before the first letter of the paragraph you wish to format. In the examples below I placed the Ibar just before the V in Venus
2. Press and hold down the left mouse button
3. Whilst holding down the left mouse button, drag the mouse pointer (now an I bar) to the end and just after the last letter of the paragraph(s) you wish to make a hyperlink of.
As microsoft Words is capable of creating web pages you need to be able use the same facilities as any other web page creation software and the main facilitiy of any web page is the ability to jump to other parts of the document by means of hyperlinks and this is done from the insert menu. Hyperlinks enable you to jump from one page to another or from one place on a page to another. Pictures as well as text can also be made into hyperlinks. Creating hyperlinks is done in the following way.
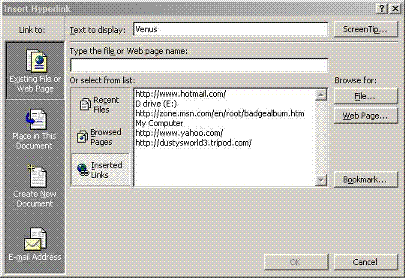 |
Insert Hyperlink dialogue box |
1. Highlight (select) the section of text or picture that you wish to make a hyperlink for (see above for how to do this)
2. Click on the Insert menu button
3. Click on the Hyperlink option and you will see the dialogue box shown right appear with the text you selected in the top box labelled text to be displayed. (You can see that I highlighted the word venus from the example document I have been using in these tutorials) You can type anything into this box and this will be the display link so it needs to be meaninful to the page ir item you are linking to.
4. Type in the text you wish the viewer of your web page to see. (In my example it will be Venus and it will link to maybe a picture of it or a further description of it)
5. Type in the address (Uniform Resource Locatore (URL)) of the page or picture you wish to link to, (If you do not know the address of it (where it is) click on the File button and you will get a standard windows file / folder navigation box through wich you can navigate to it. Select the file by clicking on it and then click on the OK button.
NOTE:- You will see three clickable buttons down the left-hand side of the main window, (the one with all the names of the files in it), clicking on the top one Recent Files will list all the files you have recently used on your computer in the large window, clicking on the middle button labelled Browsed Pages will bring up a list of all the pages you have visited on the Internet and all those you have visted on your computer, Inserted links will bring up a list of the links that you have recently clicked on. This is another way pof maybe finding a file or a link you wish to use in your hyperlink.
6. Click on the OK button and the dialogue box will vanish and the text you wished to be a hyperlink will be underlined. You can test the link by clicking on it and you should go to the page or picture that you linked to.
There are times when you are merrily typing away and you need to insert a chrcacter such as the copyright symbol, (the small circle with a small c inside it) this is not a standard feature on keyboards and so, you ask yourself how do I do this? and where do I find it? well, this and other non-keyboard characters can be found in the symbols library and is done as follows:
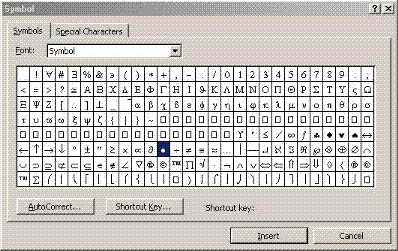 |
The Symbols library dialogue box |
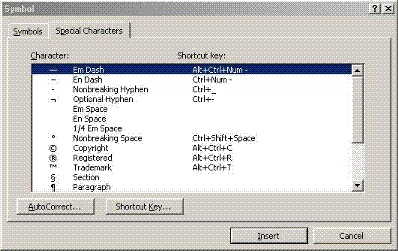 |
Special Characters symbol library |
1. Place the mouse pointer where you wish to insert the symbol
2. Click on the Insert menu button
3. Clikc on the Symbols option and you will see the symbols library dialogue box shown right appear.
4. Click on the Symbol you wish to insert to select it (you can see the dot has been selected in the example)
5. Click on the Insert button found at the bottom of the dialogue box and the symbol you selected will be inserted into your document at the place you indicated with the cursor.
6. If the symbol can't be found on the first tab, as our copyright symbol can't, click on the Special Characters tab shown right
7. Scroll through the list of chracters until you see the one you need and click on it to select it
8. Clikc on the Insert button at the bottom of the dialogue box, the dialogue box will vanish and the symbol you selected will be inserted into your document at the cursor.
![]()