Corel draw Interface
 |
Example of Corel Draw's Interface |
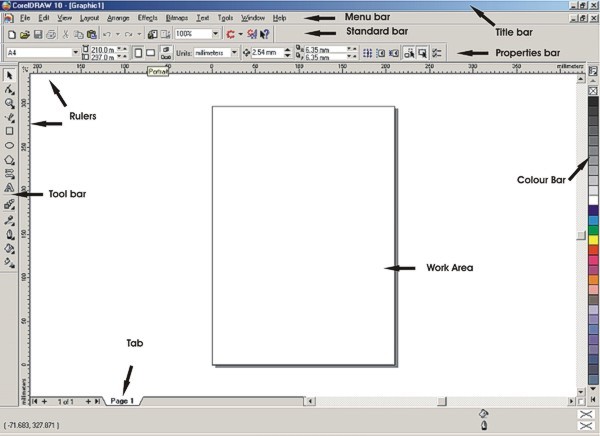
The example above shows what the interface of Corel draw looks like with the various parts labelled. As you can see it si laid out in a similar way to most computer products these days, it has the blue title bar across tha top as with most other major applications, an easy to use menu bar, the usual shortcuts on the standard tool bar, a bar where you can make various changes to the background, a colour bar down the right-hand side for quick selection of colours and a drawing tool box down the left-hand side where you can get access to the various drawing tools.
The work area is in the middle. You can also add layers (so that you can work on individual items in your scene) and tabs so that you can insert another page and start another drawing, you can also copy and paste items between pages (copy something from one page to another page) and mix and match shapes to get the desired scene.
Let's see what the main tools are about:
The Menu Bar
Corel draw has a rather standard looking menu bar and works in the same way as a menu bar does in, say, Microsoft Word, Macromedia Dreamweaver or any other application. It also gives you access to all the things you can do in Corel draw, a lot of those you will never probably need to use.
The File menu has the Open, Close, Save, Save as, Document info, (gives you the size of your document and various other bits of information about it), publish to the web option and of course the Exit option.
The Standard Bar
The Standard Bar gives you quick access to the most commonly used tasks, for example you can save your work with one mouse click on the Save button (the small diskette) or paste something with one mouse click, (the Clipboard), create a new document by clicking on the bl;ank page button. It just saves you clicking to open a menu then clicking again to select the option, (it saves you one mouse click per task) The small red almost circle is a quick way of runing other corel products. Corel Photopaint, Corel Rave and various other Corel programs are installed along with Corel Draw and that gives you quick access to them. It's quicker than going to Start > Programs > Click on program
The Edit Bar
These settings allow you to change the size of the document, (the small rectangle), the orientation of it, (either portrait (default) or landscape (tipped on it's side)), which units the ruler is in, centimetres, inches, etc., Corel Draw has a very good help system and you can find out a lot there.
The Tool Box
This gives you access to all the drawing you need in corel draw, straight lines, circles, shaping, they are listed below and some of them will be explained in other tutorials as they are being used. You will notice a small black arrow in the bottom right-hand corner of some o fthe tools, this means that there are other tools of a similar nature hidden behind it. In Corel draw when you click on one of these buttons, some more buttons fly out sideways, (like a side menu), this is known as a flyout and allows you to select any of those other buttons.
As the Tool Box is a vertical bar the best way would be to state what each button is and give a brief description of it.
| The Pick Tool allows you to select objects, it will cancel any other task you have been doing. | |
| The Shape Tool allows you to change the shape of an object by moving the nodes that it consists of. | |
| The Magnifying Tool enables you to magnify some or all of your image in order to fine tune it. | |
| The Bezier Tool enables youy to draw lines and curves you couldn't draw with the circle tool | |
| The Rectangle Tool allows you to draw rectangles | |
| The Ellipse Tool will allow you to draw circles and ellipses (ovals) | |
| The Polygon Tool will allow you to draw hexagons, spirals and grids | |
| The Arrows Tool allows you to draw various shapes, such as arrows, tubes, stars, speech boxes. | |
| The Text Tool allows you to write text anywhere on your document, the style and size can be changed | |
| The Interactive Blend tool gives you access to various blending tools and transparency tools | |
| The Eye Dropper Tool allows you to select whatever colour you wish from an existing object | |
| The Outline Tool allows you to select the width and colour of the outline you wish to draw with | |
| The Fill Tool will allow you access to various fills from a straight colour ot a textured fill | |
| The Interactive Fill Tool gives to the ability to apply various fills to your object or scene |
The Colour Bar
The Colour Bar is usually in a vertical column down the right-hand side of the screen, I have moved it to a horizontal one for this description. You can apply any colour from this bar just by selecting the object you wish to colour and clicking on the colour you wish to apply. The object or shape you apply the colour to must be closed, (all points must be joined together without gaps)
