Moving and Resizing an Object
 |
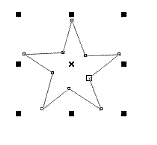
Example of selected object and sizing
handles |
Sometimes it is not always possible to draw a shape exactly where you wish it to be nor to draw it exactly the size you wish it to be so there is a way to move and object and make it larger or small, wider and taller.
When you draw a shape, no matter what the shape, clicking on the pick tool, (the small arrow at the top of the tool box (down the left-hand sid eof the screen of you haven't changed the default layout) then clicking on an object you have drawn will cause it to be surrounded by six small black squares, these are known as sizing handles and resize the object and in the middle of your object you will see a small cross, this is used to move the object around, (shown on the right)
To resize an Object:
1. Place the mouse pointer on one of the sizing handles, (one of the small black sqaures).
NOTE:- It will change into a double headed arrow showing the directions the object can be resized in.
2. Move the mouse pointer in the direction the arrows indicate and the object will be resized in that direction.
For example, if you place the mouse pointer on the top middle square, you will get a double headed arrow pointing up and down, you can onlly resize the object and make it taller or smaller, similarly, placing the mouse pointer on either of the side middle squares will display a double headed arrow pointing left and right and will only allow you to resize the object and make it wider or narrower.
Placing your mouse pointer on any of the corner squares and dragging the mouse will make the object proportionately larger or smaller. This means that both sides of the object resize at the same time and it keeps it's original dimensions, (it doesn't get squashed, stretched, etc. it stays the same shape but just gets larger or smaller)
To Move an Object:
In the example above, you will notice a small cross in the middle of the object, this allows you to move the object anywhere you wish within the work area. Moving an object is done in the following way:
1. Click on thje object to select it, (it should have the small sizing handles round it as in the example above)
2. Place the mouse pointer on the cross in the middle of the object, (the mouse cursor will also turn into t little cross shape)
3. Press and hold down the left mouse button
4. Whilst keeping the left mouse button pressed, move the mouse in the direction you wish to move the object
5. The object will follow the mouse pointer, when you have the object in the position you wish release the left mouse button.
