

Arranging Objects
As your scene gets more complex and the number of objects in it increase you will find that some objects look more natural if they are behind another object, such as a man would look more natural behind a desk instead of in front of it. Inn Corel draw this is easily achieved using the Order option in the Arrange menu
 |
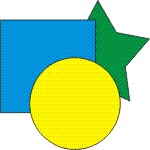 |
Example of objects with green star
on top |
Example of objects with green star
at back |
Objects are arranged using the Arrange menu, an example of this ahown below, in that example you can see the arrange menu and the order menu, the order contains various ways in which you can position the objects within a scene. In the two examples above, I have moved the green star to the back, brought the yellow circle ot the front and placed the blue square in the middle in the example on the right. I have just rearranged the order of the objects.
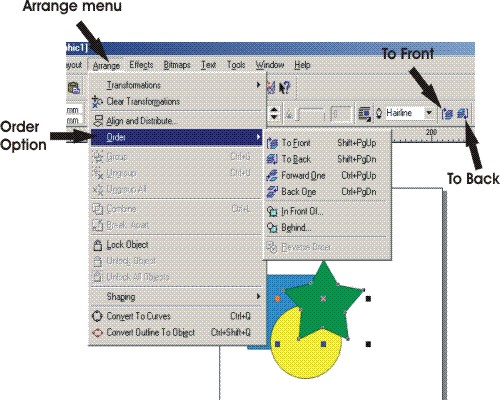 |
The order options work in the following way:
To Front - Selecting an object and then clicking on the To Front option will cause the eselected object to jump in front of all the other objects so that all the othe robjects are behind it, this happens no matter what position the selected object in currently in. For example, if you selected the yellow circle and then selected the To Front option the yellow circle would be placed in front of the blue square and the green star. You can also see in the example above that this option is marked as a one button click operation.
To Back - This does the same as the To Front option above but moves the selected object to back behind all the others. For example, if you selected the green star in the example above then selected the To Back option, thwe green star would be placed behind the Blue square and the yellow circle. In the example above, you can also see that this is marked as a one button click operation.
Forward One - This moves an object forward one space, for example, if you selected the blue square in the example above then selected the Forward One option the blue square would be placed in front of the yellow circle and behind the green star. The blue circle would be between the yallow circle and the green star.
Back One - This does the same as Forward One above but in reverse, if you selected the green star in the example above and then selected the back One option the green star would be placed behind the yellow circle. It would be between the yellow circle and the blue square.
In Front of - This option will pace an object in front of an object you specify. For example, in the example above, say i selected the blue square and wanted to place it in front of the yellow circle, I would select the blue square, then select the the In Front of option and the cursor would turn into a black arrow, I would click on the yellow circle (indicating which object I want the selected object to be placed in front of) and the blue square would be placed in front of it. (the example above is only a three siple three object example and this would be handy for scenes with more objects in it).
Behind - This does the reverse of In front of above and works in exactly the saame way. You would select an object and select this option to place the selected object behind another one (the example above is simplistic and this would be more suitable for scenes with more objects in them)
![]()