Dealing with Nodes
First of all, before we add or delete a node, you need to know what one is. A node is the small square made when you click in the work space with iether the: Freehand Tool, Bezier Tool or the Interactive Conector Tool.
Let's take the Bezier tool as an example as that will more than likely be the tool you use most. After the tool is selected, the first thing we do is click in the work space (notice I said click in the work space, if we clicked and then while the left mouse button was still pressed we slid the mouse pointer in the direction we wished to draw the line, you would produce two handles, these are for shaping the line between one node and another node) we create a node, (a small square) now if you clicked a short way to the right of that node you would produce a second node and a line joining them.
Example of a line drawn showing nodes |
If you moved the small cross another short way to the right and clicked you would produce a third node (a small square) with a line joining it to the second node. If we repeat this twice more you end up with 5 nodes connected by straight lines. as shown on the right
The small squares are known as nodes. They can be moved (what I call tweaking my drawing), deleted or added to.
To Move a Node
1. Select the Shape tool, (it's the small arrow head pointing to a line second from the top in the tool box)
2. Your mouse pointer should now be shaped like a small arrow head. Place the arrow head on the node you wish to move
3. Press and hold down the left mouse button
4. Whilst holding down the left mouse button move the mouse in the direction you wish to move the node and it will follow
5. When the node is where you wish it to be, release the left mouse button.
To Add a Node
 |
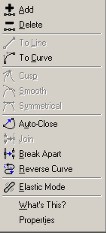
Example of right click menu |
1. Select the Shape tool, (it's the small arrow head pointing to a line second from the top in the tool box)
2. Your mouse pointer should now be shaped like a small arrow head. Place the arrow head on the line you wish to add to
3. Click the left mouse button to select the line, (it should be higlighted showing all the nodes on the line as in the example above)
4. Place the point of the arrow head ( or mouse pointer) on the line between two nodes where you wish to add a node.
5. Click the right mouse button to bring up the right mouse button menu as shown on the right
6. Select the Add option and another node will be added between the two nodes you were working between.
To Delete a Node
1. Select the Shape tool, (it's the small arrow head pointing to a line second from the top in the tool box)
2. Your mouse pointer should now be shaped like a small arrow head. Place the arrow head on the line you wish to add to
3. Click the left mouse button to select the line, (it should be higlighted showing all the nodes on the line as in the example above)
4. Place the point of the arrow head ( or mouse pointer) on the node you wish to delete.
5. Click the right mouse button to bring up the right mouse button menu as shown on the right above
6. Select the Delete option and the node you selected will be deleted
NOTE:- Another way of deleting nodes is to place the mouse pointer on the node you wish to delete and double click the left mouse button and it will be deleted.
